
Hello again!!! It is nearly Christmas time, which of course means the arrival of long – awaited patterns with sleeves!!! YEAH!!! I am going to tell you all a secret… I hate the cold… as in LOATHE the cold. I could hibernate all winter. I won’t even get started on snow. But since I hate the cold so much, I rarely sew with sleeves. It is my own personal boycott to make summer clothes all year round and layer them. While I will not ever get over my dislike of the cold, I am THRILLED to say I am over my sleeve boycott thanks to Merry and MOD, the 2 newest patterns from very talented Cassie of Little Lizard King. Please note though, of the 4, yes FOUR I made for this blog post only two have real sleeves, which is still a lot of progress for me. 😉

I love fancy Christmas dresses, and Merry and MOD make GORGEOUS dresses. Check out the various tester pics here to see amazing tester pics. When I am buying a pattern though, I want OPTIONS (not a 1 occasion pattern)… and Merry and MOD are LOADED with options. Here are a few of my favorite options:
Merry
- Sleeve options: sleeveless,
- Pleated or you can gathered skirt using the length in the pattern and your desired fabric width
- Bodice perfect for detailing with embroidery, trim, or even the Peggy Sue Bib
- Button back closure, perfect for a statement button (afraid of your button holer? I’ll share the elastic loop trick so you won’t need to button hole at all! plus detailed instructions are also in the MOD pattern
MOD
- Sleeve options: angel wing, cap, 3/4 , cap, 3/4 , and long (keep reading and I will tell you how to add sleeveless and flutter to these options!)
- Neckline perfect for embroidery
- Button placket length of dress
- Works well with solids or LOUD even need to make a button hole, prints… even character fabric for a quick present
Merry

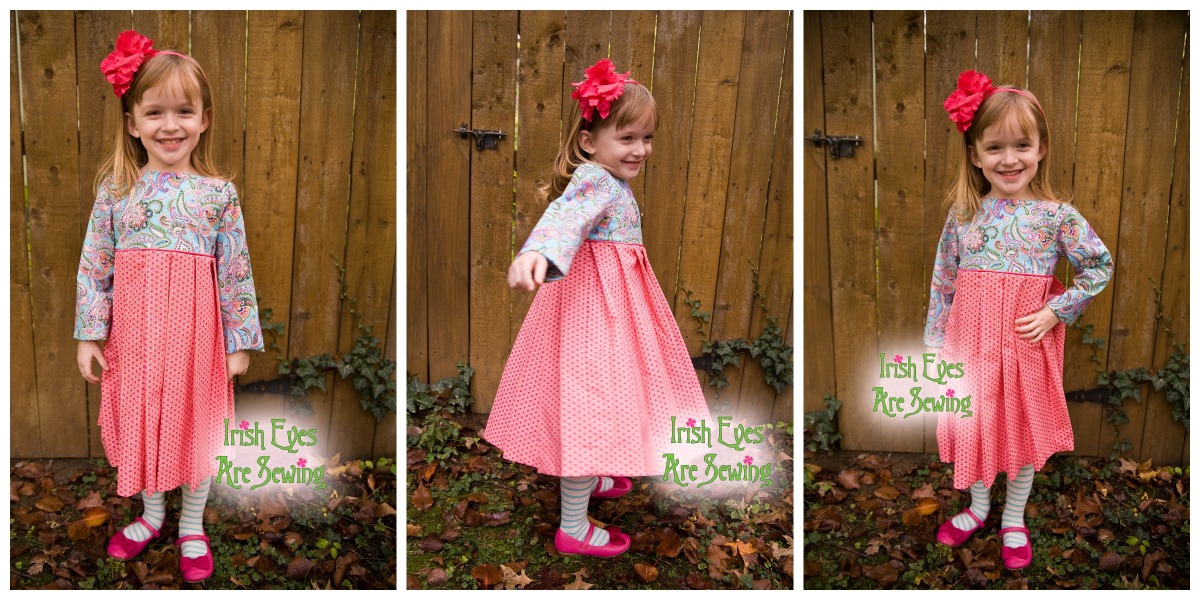
What do you say about Merry? She is gorgeous! I liked the idea of using bright springy fabric for a long sleeve dress, a “I’m-ready-for-warm-weather” mind trick to be sure! I let my darling pick out the fabric for this dress, and it was a proud mommy moment that it worked so well together. (The fabric is by springmaid, premium cotton at Joanns). If you choose non directional fabric for the skirt, you will use much less fabric. 🙂 The directions are clear and logical, like we have all come to know and love from LLK. If pleating makes you nervous – then this is a great first pattern. The pleating guide and instructions are really helpful.

The only deviation I made from the pattern instructions was to use the elastic loop so that I could use one of my BELOVED Bethany Lane “you are my sunshine” buttons. I had to adjust the length of the elastic a few times. To get a length of loop I liked, I laid the bodice down, placed the button where I wanted it. I measured the length from the edge of the fabric (where the loop would be) to holes in the button (for example 1 inch). Double that length to get to the holes and back, and then add 1 inch for the seam allowance (2inches+ 1 inch SA = 3 inches. I usually add ¼ to ½ inch more for wiggle room. Clear as mud? You can also use the instructions in MOD, as the designer’s directions are clearer than my button size-dependent method.
MOD

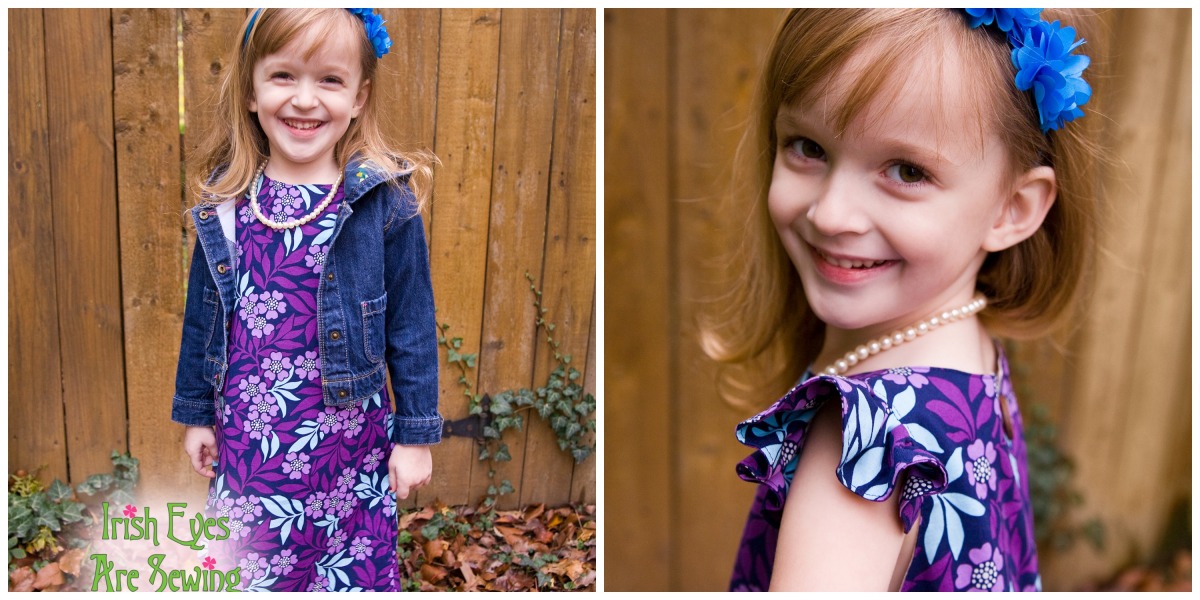
Have I mentioned to you all how much I LOVE buttons. I used to spend hours playing in my mothers button tin as a little girl, and not much has changed. MOD has the sweetest button up back, allowing you to embellish to your hearts content. If, however, your heart doesn’t sing when you see this row of buttons, Cassie also included an optional closed back option in which you can use a piece of elastic instead and remove any need for a button hole. As you can see here – both are GORGEOUS. I let my darling pick out her fabric for the first MOD, and she choose this fabric, also by springmaid at Joanns. The instructions were great, the angelwing fit perfectly into the armhole. I did the narrow hem on the sleeve, but if burning your fingers off isn’t your thing (or it it is only me who does that), you can also to a rolled hem on your serger 🙂 The MOD is perfect for trim, and since it is an Aline (not a gathered) you will use less trim on the sweet little hemline. There is about 3 yards on this size 6. I just love this dress so much, I wish it were my size! Additional Options

Flutter Sleeve Option

For me, nothing is sweeter than flutter sleeves. The years in ruffles are so short, my motto is #ruffleeverything. And the same for flutter sleeves, I add those to everything. Also – as I have gotten more comfortable in my sewing, I like to swap pattern pieces. It helps me to swap within the same pattern company so the SA will be the same for both patterns. Lucky for me, there are lots of great LLK patterns to choose pieces from. Here – I used the flutters from LLK’s fairy flutter dress, and attached them to outside shoulder seam before I sewed the main fabric to the lining. DO NOT SEW SIDE SEAMS—TRUST ME!!! Here is where I go rogue 😉 I sewed the curve of each arm hole next and clip close to the seam every ¼ inch all the way across the curve. Then I flipped the bodice to get the right sides facing out, pulling the individual sides CAREFULLY though to the front bodice. I pressed everything here to get a nice crisp look. THEN, positioned the fabric with the right sides together and sewed up the side seams. Now – you can go back to the pattern direction at that point. I choose the optional closed back because I really wanted to use this Bethany Lane “I love you” button. EasyPeezy! I think I will make half a dozen of these with the flutter sleeves.
From my early days of sewing – I could do a dress in size 3 with a yard of fabric. Now that I am sewing up 6s, there are not many dresses I can make with 1 yard. I used something solid for the lining, and so my 1 yard of this fabric was just enough to make a size 6 dress. 🙂 YEAH ME!!!
Reversible Option
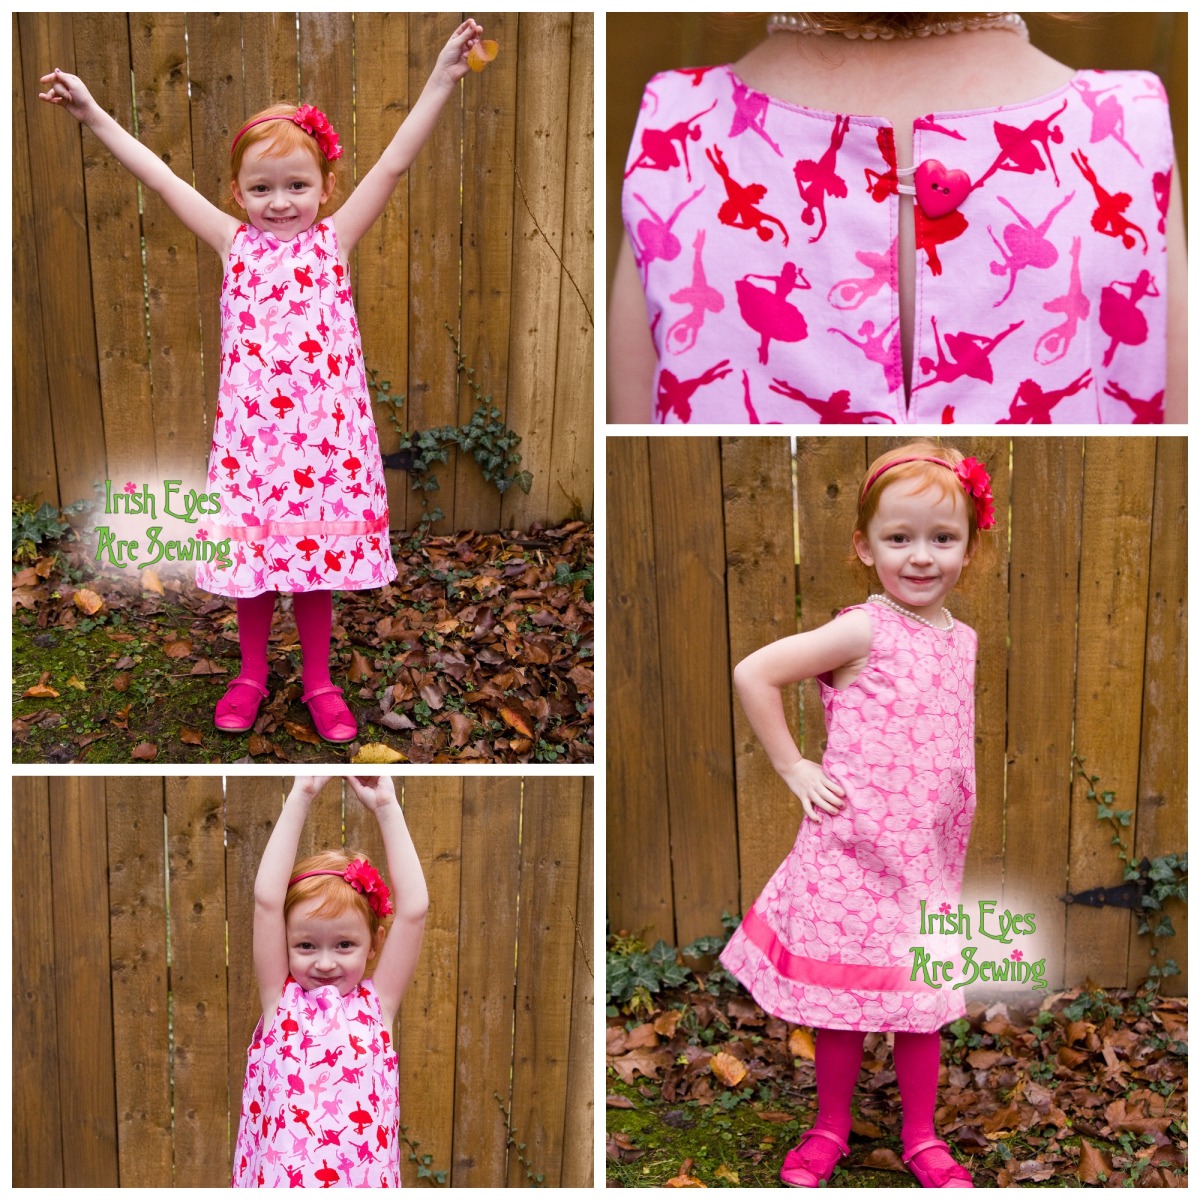
DISCLAIMER – In addition to the cold, I also loath Barbie. I know, I know. My little darling likes Barbie and has wanted a Barbie dress. I had the fabric, but have been putting off making it. I didn’t want to spend a lot of time with fabric I didn’t love. As I read the MOD instructions, I also wanted to see if I could make MOD reversible, and you CAN! A reversible MOD seemed like the perfect time to use that Barbie fabric as well as some much loved ballet fabric. And surprisingly to me, the reversible one was the quickest sew for me. #mommywin To make it reversible, it needs to be sleeveless. Instead of cutting lining pieces, cut the front and both back pieces in the second material of your choice. Assemble at the shoulder seams per pattern instructions. Again – DO NOT SEW SIDE SEAMS!!! (my seam ripper and I had a LOT of quality time making these dresses, learn from my mistakes!) Again – this is where I deviated from the pattern. I sewed the curve of each arm hole and CLIP-CLIP-CLIP. Then I flipped the bodice, pulling the individual sides CAREFULLY though to the front bodice. I pressed everything here to get a nice crisp look. THEN, positioned the fabric with the right sides together and sewed up the side seams. Now – you can go back to the pattern directions at that point. Make sure to use the optional closed back. I think conceptually the long button placket would work, but the kiddo would be sitting on 2 rows of buttons, and that might not make them very happy. I added ribbon to each side of the dress – which can easily be done before hemming, just be careful to tuck the side not being used WAY up into the dress. To hem, I ironed each side up ½ inch, and then pinned together and sewed all the way around the hemline. Voile! A reversible dress.
I want to thank the incredible talented Cassie of LLK for letting me test Merry and for letting me blog them both. I want to thank the BEYOND amazing Andrea of Red Clover Red Clover for her continued generosity in sharing her photography talent. And, since I get to see and examine her beautiful customs, I can tell you she is JUST as amazing with her sewing machine as she is her camera. I also want to thank the adorable Miss Anna and Miss Elsa for modeling for me. It does not get any cuter than these dolls!

Click below to enter rafflecopter to win you own free copies of Merry and Mod. 🙂 #merryandmod #makealltheoptions.

The reversible Mod is the option I really liked. 2 dress in 1.
LikeLike
I’m love the angel sleeves.
LikeLike
These are adorable. I can wait to get some sewing time to try out all the options. Thank you for the review and giveaway!
LikeLike
These are adorable. I can’t wait to get some sewing time to try out all the options. Thank you for the review and giveaway.
LikeLike
I love all the different sleeves on the Mod. =)
LikeLike
Love those flutter sleeves!
LikeLike
Absolutely love the reversible option!
LikeLike
Your sewing tips are fabulous, just how I would have done it too! I love that the Mod can be reversible and those pleats on the Merry! LOVE!
LikeLike